Monday, 14 May 2018

Wine from 200 Vines Part 1: Site and Vine Selection

I was standing in the front paddock a few months ago and realised that there was a gentle, North-facing slope. Why not plant some vines?
Hiking through vines in the Asti Region of Northern Italy

This is the first of probably many posts as we embark on our home vineyard journey.

Who, at some point, has not dreamed of the idea of growing their own grapes and making wine? The idea of looking down on the green vines from your summer deck, with a glass of wine in hand, thinking of the harvest. Or tending to the bare vines in the middle of winter, preparing for the next years crop?

To begin I did a lot of reading. Probably the best document I found is this one, published in all places, Queensland! Not really known for their wine, but the practices of growing grapes and making wine are quite standardised. The document is 20 years old, but the information it contains has agreed with every conversation I have had with local wine growers.

The other fantastic source of information has been from the local winemakers: Don at Welshman's Reef, Bruce at Chalmers and the kind people at Harcourt Valley Vineyard.

Next come the key questions:
  1. What varietal and clone to plant?
  2. What rootstock to pair it with?
  3. How many vines to order?

Firstly, we needed to determine what we want to grow and how many vines, so that we could place an order with a suitable grower this year before the end of June, so that our vines could be grafted and grown ready for planting in Spring 2019 (yes, 2019!).

The first question was one variety or two? The answer - One. Because you can make two wines from the one batch of juice. For example, a red and a rose. This gives some flexibility to the process depending on yearly yield and also simplifies the harvesting and fermenting processes.

There are so many varietals as well as root stocks, but we have chosen Sangiovese clone Matura 7 (Mat 7). This is because Sangiovese is less common in central Victoria (Shiraz being dominant) but grows well, particularly in the Heathcote area. Secondly, it is a forgiving grape, like Shiraz, but unlike Tempranillo which can be low in acidity. The Mat 7 clone was suggested as it simply makes great wine and has vibrant, dark fruit. This is a clone that is being grown both locally and in the King Valley region.

Rootstock is another key selection criteria. Our objective is to grow un-irrigated, once established, therefore a recommended rootstock is Richter 110. This sends down deep roots and therefore tolerates drier conditions. It is also of medium to high vigour, meaning that the yield should be good despite the low water use.

To determine how many vines to plant we sat down with Ron and Julia from Welshman's Reef Winery and did some back-of-the-envelope calculations:

Assuming we get 3kg fruit per vine...
200 vines would give 600kg fruit...
Assuming 60% juice yield, this gives 360 litres juice...
Which can fit in either a Barrique (225 litres) or a Barrel (360 litres), as we are aiming for barrel aged wine which makes a more professional wine than oak chips.

Therefore if we have a good year we can use most of the juice to make a red wine and the remainder
to make a rose.

So, we have now ordered 200 Sangiovese Mat 7 + R110 clones from Chalmers Nursery based in Mildura, which will be picked up by us in October 2019.

In the next post we will cover vineyard layout and preparation.

Sunday, 24 September 2017

Landscape restoration: Managing erosion

Today we had the fun and privilege of another Muckleford Landcare workshop run by the very talented leadership team.

The workshop focused on how water can erode a landscape and what actions we can take to control this powerful eroding force.

Water is destructive

Our visit to a member's property showed us several problems that have been caused historically by deforestation due to gold mining as well as stock grazing and general land clearing.

The lack of plants has one significant effect, erosion, which is caused by the inability of the terrain to slow down the water as it descends the natural catchment areas.

Water travelling at speed has two flow-on effects (grown... pun) - erosion and lack of ground penetration. Both prevent the germination of plants - our ideal warrior against this foe.

The signs of erosion to look for on your property are:

  • Tunnelling - water concentrates its force and erodes a hole under the ground, similar to the effect a garden hose would have at high pressure
  • Capping - where the ground is completely free of vegetation and therefore highly susceptible to erosion
  • Blow-out - where an earth wall has been built to contain the water, such as in a dam, but where the engineering has failed when exposed to high water volumes
  • Gullys - water has descended a hill or natural depression at high speed and eroded the ground to form a deep gully
Gully erosion in the Muckleford forest

Erosion prevents natural landscape recovery

Nearly all these problems prevent the resowing or germination of any plant species, including grasses, making this a continuous issue which, if left unmanaged, will result in dirt and sediment continuing to contaminate the existing waterways which feed the local drinking water and provide irrigation for farmers.

While major erosion, such as gullys, is an obvious symptom, the problem of "capping" is wide-spread across many properties and should be drawn to the attention of any conscientious land holder.
Capped area with preventative measures

Taking a whole-of-landscape approach

The natural tendency when looking to solve the problems of erosion is to tackle the obvious issues first, such as the gullys, however, these bigger symptoms are caused by the end result of water cascading down a catchment area and gathering speed, often over capped, bare ground.

To deal with downstream erosion we need to lift our gaze higher up the catchment area and observe the landscape to identify points which cause the water to speed up.

There can also be a tendency when dealing with major erosion to bring in earth moving equipment and attempt to address the issue (or symptom) by major reworking of the area.

By dealing with symptoms we can incur significant cost, disturb the ground causing even more erosion and, fundamentally, not address the core problems.

Slowing the water

To prevent water forming powerful channels and eroding our farms we need to disperse the flow. By spreading out the flow over a wider area we can address the two major issues of speed and ground penetration.

A cost-effective, although time-consuming approach that any landholder can apply is to use local materials to help disperse the water. Branches laid across the water's course, up-stream of capped areas, can disperse the water. As this process is repeated down a hill, the cumulative effect can be greatly enhanced.

Dispersing water with branches (and a native animal)
We are not trying to dam the water as solid structures will likely be washed away in the next big downpour. Instead a loose collection of twigs and branches is sufficient to break the flow of the water and create calm areas in which plants can self-sow and begin the restoration process.

Time and patience

The approach above does rely on a fair amount of work and then time to come to fruition. The above photo shows a treatment that took four hours a day for four months. Once stick at a time!

Over time the treated areas will naturally attract sediment and plant matter, creating ideal seeding zones for self-sown plants as well as the opportunity for tube-stock planting.

We would expect to wait approximately two years before assessing the effect of the treatment prior to any type of planting intervention. Many landscapes can recover by themselves once they are given the opportunity.

Key workshop take-aways

  • Take a whole-of-landscape approach
  • Tackle the sickness, not the symptom
  • Don't jump straight on to the big problems first
  • Start your treatments higher up the catchment zone and work down
  • Expensive treatments are not always the best
  • Do a little every day
  • Be patient
Thanks again to everyone at the workshop for their time and energy. Happy landscaping!

Friday, 4 August 2017

Making a Recycled Wood Coffee Table

I need a coffee table for the house on the acreage, so what better way to make a rustic one than yourself out of recycled wood.

Step 1 - Source the wood

The best local-ish timber/lumber place is Urban Salvage in Spotswood, west of Melbourne. They sell both reclaimed timber as well as new, kiln-dried. I prefer the reclaimed, however you are restricted by size.

I'll be making this table from recycled Messmate, which has been the most common building timber in Victoria and therefore creates the most amount of recycled and remilled timber.

It comes in a variety of sizes, but I'll be using 80 x 40 mm for the legs and ends and 115 x 35 mm for the top. The bottom shelf is from 142 x 19 mm flooring, while the rails will be cut from 100 x 40 mm lengths.

Step 2 - Design

Recycled timber coffee table design in SketchupThis design uses the 80 mm beams for every piece except the lower shelf, which has three pieces at 19 mm. Some pieces, such as the side rails, will need to be cut from the 100 mm pieces

I'm only using edge-gluing and biscuit joining in this piece to keep things simple.

Step 3 - The lower shelf and side rails

This is made from 3 pieces of 142 x 19 mm flooring where I have removed the tongues and grooves on the table saw.

I checked my edges for square (perfect!) and set up my jig for gluing.


Preparing for glue upI have decided not to use biscuits for the shelf and instead to use edge joints with sufficient clamping to create a flat surface.


The boards are sitting on strong rails that are taped over to prevent damage from any excess glue. The the boards are edge glued and aligned and a top rail is clamped down to level the boards.


Finally, the horizontal clamps are tightened to pull the boards together. I left the jig overnight to dry.


I also cut the two side rails at 40 mm high (to match the end rails) and biscuit joined them to the main piece.


1st gluing of the top Step 4 - The table top

I'm gluing up the table top in three separate stages to ensure it is as flat as possible. Without a thicknesser, I cannot guarantee that the boards will align, so I need to avoid as much sanding as possible but getting the boards to glue up as close as possible. I have used the table saw to get the edges square.

I'm starting with three boards. The middles board is not quite the same as the other two, so I'm using clamps to hold the pieces as close as possible while the glue sets.

Then I join the side pieces on with biscuits. This allows for some variation in the side pieces and gets them correctly aligned. This, in turn, reduces sanding.


Step 6 - Then end frames

The end frames are quite simple pieces, all biscuit joined together. I'm using double biscuits, well aware that these joints are not as strong as traditional mortise and tenon joins. But I don't have the equipment and can't justify the cost just yet. So its biscuits all the way!

To get the double biscuits aligned, I used the table top as the main edge, then used 6 mm MDF as well as 19 mm ply as spacers. This gave me consisted biscuit spacing with 6 mm between the biscuits. I was very happy with this process as it was really easy and the result as a frame that was easy to glue up.

Prior to gluing I did the all-important step of cutting additional biscuits to glue the bottom shelf in place, as well as biscuits for the top two side rails. This will make life a lot easier afterwards.

I also cut a 5 mm slot in all the top pieces to allow table z clips to be used to join the top on afterwards.

 After all this measuring and cutting, I finally had my two ends!

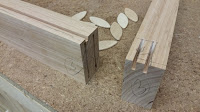
Step 7 - The crossed end pieces

While the crosses on the end are the hardest part, they really add an element of design to what is otherwise a pretty standard oblong table.

It was quite easy in the end. I simply lined up the cut pieces on the finished end-frames, drew a line with the pencil, then adjusted the drop-down mitre saw to cut at that angle. It went very well and I had the main cuts done in no time.

Then I repeated the process for the partial cuts to allow the crosses to interlock with each other. I set the depth of the mitre saw to 19 mm (halfway) and did a series of cuts to create the final groove in the timber. Then it all slotted together nicely.

I then drilled holes from the top and bottom of the frame to enable later screwing in of the crosses.

Step 8 - The big glue-up

Glue-upGluing takes two people, not because it is complicated but because you just need an extra pair of hands to hold things in place.

I don't have fancy woodworking clamps that can cover the length of the table, so instead I used ratchet tie-downs across the top and the bottom. This pulled the pieces together quite nicely.

After leaving this overnight, I was happy with the result.

Step 8 - Sanding and finishing

I sanded with the belt sander to from 40 then to 80 grit and finally with the orbital sander to 180. Then by hand to 240.

Cleaning up the dust is easiest with a Tack-Cloth. If you have never used one before, this is definitely recommended as it is a sticky cloth that can pick up the fine dust. It is especially good prior to painting, but I use it prior to oiling as well. You can pick them up from any hardware store. Just know what to ask for...

For this project I have opted to use Danish Oil with a satin urethane over the top. Danish Oil is a beautiful finish for any old timber as it soaks in and darkens the timber, but not too much. Just enough to bring out all the grain and texture. You can then paint over the top and a urethane is best for a table to give it some surface strength. I use Minwax Wipe-on Poly, oil based (because the water-based stuff is horrible). This produces a run-free finish, although it does require 3 to 4 coats. But it is good for getting in to small crevices, such as those created by the crosses.
Applying wax
I did end up finishing the crosses before final installation. This enabled me to apply furniture wax. I also finished the base prior to screwing the top on.

The final finish was done by using furniture wax and 0000 steel wool. Just rub the wax in with wool and plenty of elbow-grease, then get some clean wool and wipe up the excess, turning the clean wool several times to ensure all traces of excess wax are removed. This ensures that the surface will be free from smudges once used.

Step 9 - Attach the top

The top was attached by Z-Clips. These came from a woodworking supply shop and are easy to install with 8Gx20mm timber screws.

This gives us the finished product!
Finished coffee table

I hope you enjoyed reading this and if you have any questions, feel free to send me a message.