Showing posts with label Vineyard. Show all posts

Wednesday, 25 September 2019

Wine from 200 Vines Part 3: Trellis Installation

It's Winter so its time to get our vineyard trellising installed, ready for our Spring planting.

The vine rows have all been fertilised with the neighbour's manure which has then been dug in via a rotary hoe:


Scale is the key factor here. We have 8 rows that require 16 trellis ends, or "end assemblies" as they are known around here. This is too much for us to do by ourselves with a pick and shovel, so we have to pay a fencing contractor for this job. However, the scale is not so big that we need them to do the wiring. Instead, we can complete that ourselves.


As you can see, the trellis ends are using a pole as a diagonal brace. This gives a less bulky structure that a traditional box shape and is more elegant to look at.

The final height of the end posts is 1800 mm above the ground (2400 mm total length) and the short posts are 200 mm. They are spaces 2800 mm.

Next, we add the steel posts between the trellis ends. Steel is better than the CCA treated posts as it is recyclable. CCA pine cannot be burned and therefore must be put in landfill if it is removed from the ground. We want to minimise the environmental impact of our farm, so steel is the best option.

The posts below are Waratah Gripfast 2400 mm vine trellis posts.


Now we add wire. We are reusing 2.85 mm high-tension fencing wire that we salvaged from a fence that we removed. This is the standard diameter for the fruiting (cordon) wire, and should be adequate for the irrigation wire. It might be a bit large for the fruiting wires but we'll see how we go.

Again, because this is small scale, we can use ratchet tensioners for each wire. This would be cost-prohibitive in a large winery, but we only need 32. 
We've also dug a trench to get our irrigation system installed.
The irrigation tubing is 13 mm for each vine row with 19 mm across each end. This will be fed from a 32 mm pipe from the water tank.
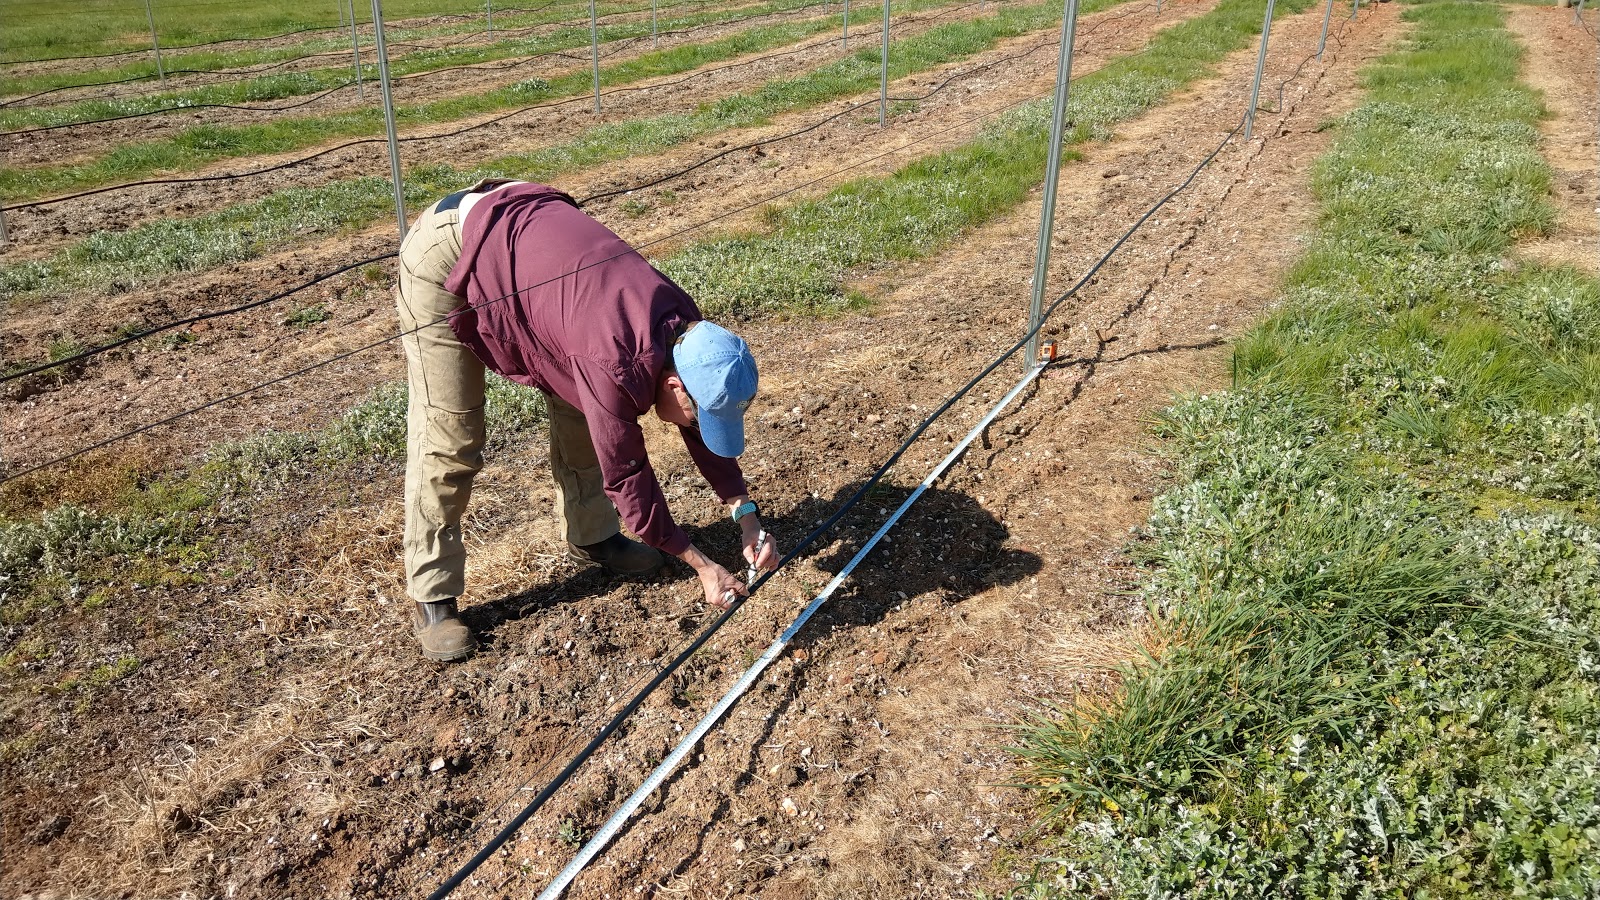
The drip tube is tied to the drip wire with cable ties.

Ok. So now we have our vineyard trellised and plumbed and ready for the next step... Planting !

Friday, 8 June 2018

Wine from 200 Vines Part 2: Layout and Soil Preparation

One of the challenges over the last summer has been the hot, dry north sun killing many of the plants in our garden. Advice from Bruce at Chalmers Vineyard suggests that some new vineyards are being planted in an East-West orientation instead of the tradtional North-South to enable leaves to shade fruit during the hot, dry months of February to April, leading up to harvest.

Therefore the site was pegged out in an East-West orientation.

The goal here was to mark out the rows to enable a tractor to come in and rip. Ripping breaks the compacted soil and allows nutrients and moisture to deeply penetrate the land. In turn, the vines will be able to send roots down to find water, thereby minimising irrigation - a key goal in the process.

Row spacing is 3 metres as advised from several wineries. Overall row length for ripping is calulated on a vine spacing of 1.5 metres, plus an extra 1 metre before and after the first and last vines respectively. This means for 25 vines the length is (24 x 1.5) + (2 x 1) = 38 metres. Pegs were then put in an addtional 3 metres before and after this to avoid them being dug up by the tractor, which means peg spacing of 38 + (2x3) = 44 metres.

We are trying to avoid ripping in the areas where the fencing end-assemblies will be, to ensure they are in stable ground.
Measuring the row spacing and marking with chalk.

Using string to align the pegs.

Now that the site is pegged out the ripping can occur. This is done via a single, winged tine (known as a Yeoman's Plough) which can rip to about 500mm deep. The rig is also fitted with a spinning plough to help break up the topsoil and kill weeds. The tractor made two passes over the ground to ensure a deep rip.

Here are some photos of the ripping process:


The finished result.
Now we have prepared the soil, we move on to a standard approach for growing fruit trees. Add gypsum, adjust the pH, fertilise and sow a green manure crop.

Gypsum was bought in bulk from Dellavedova in Maryborough. 350kg for $27 is great value. This was applied evenly to all 8 rows.

A pH tester (bought from the local Home Hardware) showed the soil at three different locations to be a surpriing pH7. It was fully expected that the pH would be acidic (< 7) and that lime would be required. It was good to avoid this step.

Finally, a full trailer load of chicken manure was bought for $13.20 from Hazeldene's Chicken Farm at Bendigo. This is great value because they will fill whatever size tray you have for that price. This is also a good way to ferilise the area as the chook poo is mixed with a lot of grain husks from the chicken feed which adds an additional amount of organic matter to the soil which will rot away over time.

At the same time as the fertiliser is added, a green manure crop is also sown.

Green manure crops are a mixture of seeds from cereal and legumes that help to fix nitrogen in the soil and are also ploughed back in 6 weeks after sowing to add further organic matter.

The green manure seed mixture was bought from Bush's Produce in Bendigo. They recommended 100g per square metre. We have 320 square metres, therefore we need 3.2kg. We purchased 10kg for $25 so that we could sow additional crops if necessary.

This was a mixture of barley, wheat, oats, peas and lupins, 50:50 cereals:legumes.

Here is a photo of fertilising and sowing:
Sowing a green manure crop.
Now that the preparation works are complete we are relying on Autumn and Winter rains to wet the soil and germinate the seeds.

We expect to be ploughing the manure crop in 6 weeks, before any hard stems develop which facilitates the decomposition process.

Monday, 14 May 2018

Wine from 200 Vines Part 1: Site and Vine Selection

I was standing in the front paddock a few months ago and realised that there was a gentle, North-facing slope. Why not plant some vines?
Hiking through vines in the Asti Region of Northern Italy

This is the first of probably many posts as we embark on our home vineyard journey.

Who, at some point, has not dreamed of the idea of growing their own grapes and making wine? The idea of looking down on the green vines from your summer deck, with a glass of wine in hand, thinking of the harvest. Or tending to the bare vines in the middle of winter, preparing for the next years crop?

To begin I did a lot of reading. Probably the best document I found is this one, published in all places, Queensland! Not really known for their wine, but the practices of growing grapes and making wine are quite standardised. The document is 20 years old, but the information it contains has agreed with every conversation I have had with local wine growers.

The other fantastic source of information has been from the local winemakers: Don at Welshman's Reef, Bruce at Chalmers and the kind people at Harcourt Valley Vineyard.

Next come the key questions:
  1. What varietal and clone to plant?
  2. What rootstock to pair it with?
  3. How many vines to order?

Firstly, we needed to determine what we want to grow and how many vines, so that we could place an order with a suitable grower this year before the end of June, so that our vines could be grafted and grown ready for planting in Spring 2019 (yes, 2019!).

The first question was one variety or two? The answer - One. Because you can make two wines from the one batch of juice. For example, a red and a rose. This gives some flexibility to the process depending on yearly yield and also simplifies the harvesting and fermenting processes.

There are so many varietals as well as root stocks, but we have chosen Sangiovese clone Matura 7 (Mat 7). This is because Sangiovese is less common in central Victoria (Shiraz being dominant) but grows well, particularly in the Heathcote area. Secondly, it is a forgiving grape, like Shiraz, but unlike Tempranillo which can be low in acidity. The Mat 7 clone was suggested as it simply makes great wine and has vibrant, dark fruit. This is a clone that is being grown both locally and in the King Valley region.

Rootstock is another key selection criteria. Our objective is to grow un-irrigated, once established, therefore a recommended rootstock is Richter 110. This sends down deep roots and therefore tolerates drier conditions. It is also of medium to high vigour, meaning that the yield should be good despite the low water use.

To determine how many vines to plant we sat down with Ron and Julia from Welshman's Reef Winery and did some back-of-the-envelope calculations:

Assuming we get 3kg fruit per vine...
200 vines would give 600kg fruit...
Assuming 60% juice yield, this gives 360 litres juice...
Which can fit in either a Barrique (225 litres) or a Barrel (360 litres), as we are aiming for barrel aged wine which makes a more professional wine than oak chips.

Therefore if we have a good year we can use most of the juice to make a red wine and the remainder
to make a rose.

So, we have now ordered 200 Sangiovese Mat 7 + R110 clones from Chalmers Nursery based in Mildura, which will be picked up by us in October 2019.

In the next post we will cover vineyard layout and preparation.