Showing posts with label Woodworking. Show all posts

Tuesday, 11 December 2018

How to Build a Double Bench with Table

I recently built this double bench with a centre table to replace some camp chairs and brighten up the place.


This is from a design that I made on the brilliant Sketchup program based on other designs I found there.

The primary improvement I made was to slope the seat 5 degrees, which leads to a more comfortable sitting position and does not overly complicate the build process if you have a mitre saw.

The Sketchup design can be found here.

The Sketchup model looks like this:

Materials

For all the sides, rails and supports, I used 90 x 45 mm recycled timber.

The front horizontal rail is bigger at 140 x  45 mm. This height is not critical - adjust your build accordingly.

The seat slats are 108 x 19mm floorboards cut down to 86 mm wide. You could use any decking timber.

The table and arm rests were milled from an old piece of timber to 130 x 28 mm. This was custom-milled. As long as they are all the same thickness, the overall piece will look good.

I used 14 - 10g x 75 mm stainless steel screws for the majority of joins.

8 - 10 g 40 mm screws were used to attach the seat slats.

The piece was finished with outdoor decking oil.

Step 1: The Frame

To build the frame you need to cut the correct angles of the rails: 5 degrees for one end and 10 degrees for the other. This leads to an overall slope for the back of 15%.

The first cut to make is the small bevel where the front seat slat will sit. This cut needs to be first so that you can align the timber correctly on the mitre saw. This is a 5 degree cut of only 3mm.

Once you have made this cut, do the other 5 degree cut for the front, then do the 10 degree cut for the back.

Once complete you can assemble the frame:

Step 2:  The Sides

Making the sides is straight-forward. Cut all the pieces, including the 15 degree cut to the back of the top rail and join all the pieces.

In this design I chose to cut a notch in the vertical front pieces to support the front horizontal rail. To do this a did multiple passes on the mitre saw with the depth set to 45 mm (half the depth of the vertical piece). This adds a nice effect to the overall piece. If this is too hard for you, or if you don't have the right tools, just leave this step out and cut your front rail the same width as the rear rail.

To get the pieces square, measure and triangulate and adjust accordingly. If these pieces aren't square, then the rest of the build will be difficult.
Attach these pieces to your frame.

Step 3: Seat Slats

The seat slats need to go on next as you will have to temporarily remove the upper side rail to gain access to drilling and screwing.

I cut a bunch of 9mm spacers to help lay out the slats.

Once you have finished attaching them, reattach your side rails.
 

Step 4: The Back

The back pieces need to be square and all the same length. It is also nice to round them over to take away the bulky feel of the overall piece.

To round them, I drew a semicicle using a round saucer. Try to aim for a radius of about 45 mm (half the width of the timber). Then I cut using a jigsaw. On the recycled hardwood I used, this was quite difficult as the timber burns as the saw turns. Sanding tidies this up.

Once you have your four pieces, attach them to your frame:

The side pieces can be used to stabilise the two at each end, while the middle pieces can do with an extra screw. I used 3 screws in for the middle pieces. All others have 2 at each point (4 in total).

Step 5: The back slats and table supports

The back slats go next to ensure that the back rails are the correct distance apart. If you attach the top slat first, you can correct for any warping in the vertical rails.

Once you have all the slats on, go ahead and attached the pieces that will support the centre table, taking care to align the rear piece carefully to ensure the table will be level. It's best to do this on a level surface and use a spirit level to align the rear piece.

Step 6:  The Table and Arm Rests

Finally, attach your table and arm rests.

I decided to shape the arm rests with a jigsaw to give a nicer overall look, but this is optional. You may alternatively round the rear corners the same as the back supports to soften the look without overcomplicating the build.


I hope you enjoy this design. If you build your own or have any comments or suggestions, please let me know.

Friday, 4 August 2017

Making a Recycled Wood Coffee Table

I need a coffee table for the house on the acreage, so what better way to make a rustic one than yourself out of recycled wood.

Step 1 - Source the wood

The best local-ish timber/lumber place is Urban Salvage in Spotswood, west of Melbourne. They sell both reclaimed timber as well as new, kiln-dried. I prefer the reclaimed, however you are restricted by size.

I'll be making this table from recycled Messmate, which has been the most common building timber in Victoria and therefore creates the most amount of recycled and remilled timber.

It comes in a variety of sizes, but I'll be using 80 x 40 mm for the legs and ends and 115 x 35 mm for the top. The bottom shelf is from 142 x 19 mm flooring, while the rails will be cut from 100 x 40 mm lengths.

Step 2 - Design

Recycled timber coffee table design in SketchupThis design uses the 80 mm beams for every piece except the lower shelf, which has three pieces at 19 mm. Some pieces, such as the side rails, will need to be cut from the 100 mm pieces

I'm only using edge-gluing and biscuit joining in this piece to keep things simple.

Step 3 - The lower shelf and side rails

This is made from 3 pieces of 142 x 19 mm flooring where I have removed the tongues and grooves on the table saw.

I checked my edges for square (perfect!) and set up my jig for gluing.


Preparing for glue upI have decided not to use biscuits for the shelf and instead to use edge joints with sufficient clamping to create a flat surface.


The boards are sitting on strong rails that are taped over to prevent damage from any excess glue. The the boards are edge glued and aligned and a top rail is clamped down to level the boards.


Finally, the horizontal clamps are tightened to pull the boards together. I left the jig overnight to dry.


I also cut the two side rails at 40 mm high (to match the end rails) and biscuit joined them to the main piece.


1st gluing of the top Step 4 - The table top

I'm gluing up the table top in three separate stages to ensure it is as flat as possible. Without a thicknesser, I cannot guarantee that the boards will align, so I need to avoid as much sanding as possible but getting the boards to glue up as close as possible. I have used the table saw to get the edges square.

I'm starting with three boards. The middles board is not quite the same as the other two, so I'm using clamps to hold the pieces as close as possible while the glue sets.

Then I join the side pieces on with biscuits. This allows for some variation in the side pieces and gets them correctly aligned. This, in turn, reduces sanding.


Step 6 - Then end frames

The end frames are quite simple pieces, all biscuit joined together. I'm using double biscuits, well aware that these joints are not as strong as traditional mortise and tenon joins. But I don't have the equipment and can't justify the cost just yet. So its biscuits all the way!

To get the double biscuits aligned, I used the table top as the main edge, then used 6 mm MDF as well as 19 mm ply as spacers. This gave me consisted biscuit spacing with 6 mm between the biscuits. I was very happy with this process as it was really easy and the result as a frame that was easy to glue up.

Prior to gluing I did the all-important step of cutting additional biscuits to glue the bottom shelf in place, as well as biscuits for the top two side rails. This will make life a lot easier afterwards.

I also cut a 5 mm slot in all the top pieces to allow table z clips to be used to join the top on afterwards.

 After all this measuring and cutting, I finally had my two ends!

Step 7 - The crossed end pieces

While the crosses on the end are the hardest part, they really add an element of design to what is otherwise a pretty standard oblong table.

It was quite easy in the end. I simply lined up the cut pieces on the finished end-frames, drew a line with the pencil, then adjusted the drop-down mitre saw to cut at that angle. It went very well and I had the main cuts done in no time.

Then I repeated the process for the partial cuts to allow the crosses to interlock with each other. I set the depth of the mitre saw to 19 mm (halfway) and did a series of cuts to create the final groove in the timber. Then it all slotted together nicely.

I then drilled holes from the top and bottom of the frame to enable later screwing in of the crosses.

Step 8 - The big glue-up

Glue-upGluing takes two people, not because it is complicated but because you just need an extra pair of hands to hold things in place.

I don't have fancy woodworking clamps that can cover the length of the table, so instead I used ratchet tie-downs across the top and the bottom. This pulled the pieces together quite nicely.

After leaving this overnight, I was happy with the result.

Step 8 - Sanding and finishing

I sanded with the belt sander to from 40 then to 80 grit and finally with the orbital sander to 180. Then by hand to 240.

Cleaning up the dust is easiest with a Tack-Cloth. If you have never used one before, this is definitely recommended as it is a sticky cloth that can pick up the fine dust. It is especially good prior to painting, but I use it prior to oiling as well. You can pick them up from any hardware store. Just know what to ask for...

For this project I have opted to use Danish Oil with a satin urethane over the top. Danish Oil is a beautiful finish for any old timber as it soaks in and darkens the timber, but not too much. Just enough to bring out all the grain and texture. You can then paint over the top and a urethane is best for a table to give it some surface strength. I use Minwax Wipe-on Poly, oil based (because the water-based stuff is horrible). This produces a run-free finish, although it does require 3 to 4 coats. But it is good for getting in to small crevices, such as those created by the crosses.
Applying wax
I did end up finishing the crosses before final installation. This enabled me to apply furniture wax. I also finished the base prior to screwing the top on.

The final finish was done by using furniture wax and 0000 steel wool. Just rub the wax in with wool and plenty of elbow-grease, then get some clean wool and wipe up the excess, turning the clean wool several times to ensure all traces of excess wax are removed. This ensures that the surface will be free from smudges once used.

Step 9 - Attach the top

The top was attached by Z-Clips. These came from a woodworking supply shop and are easy to install with 8Gx20mm timber screws.

This gives us the finished product!
Finished coffee table

I hope you enjoyed reading this and if you have any questions, feel free to send me a message.


Tuesday, 20 June 2017

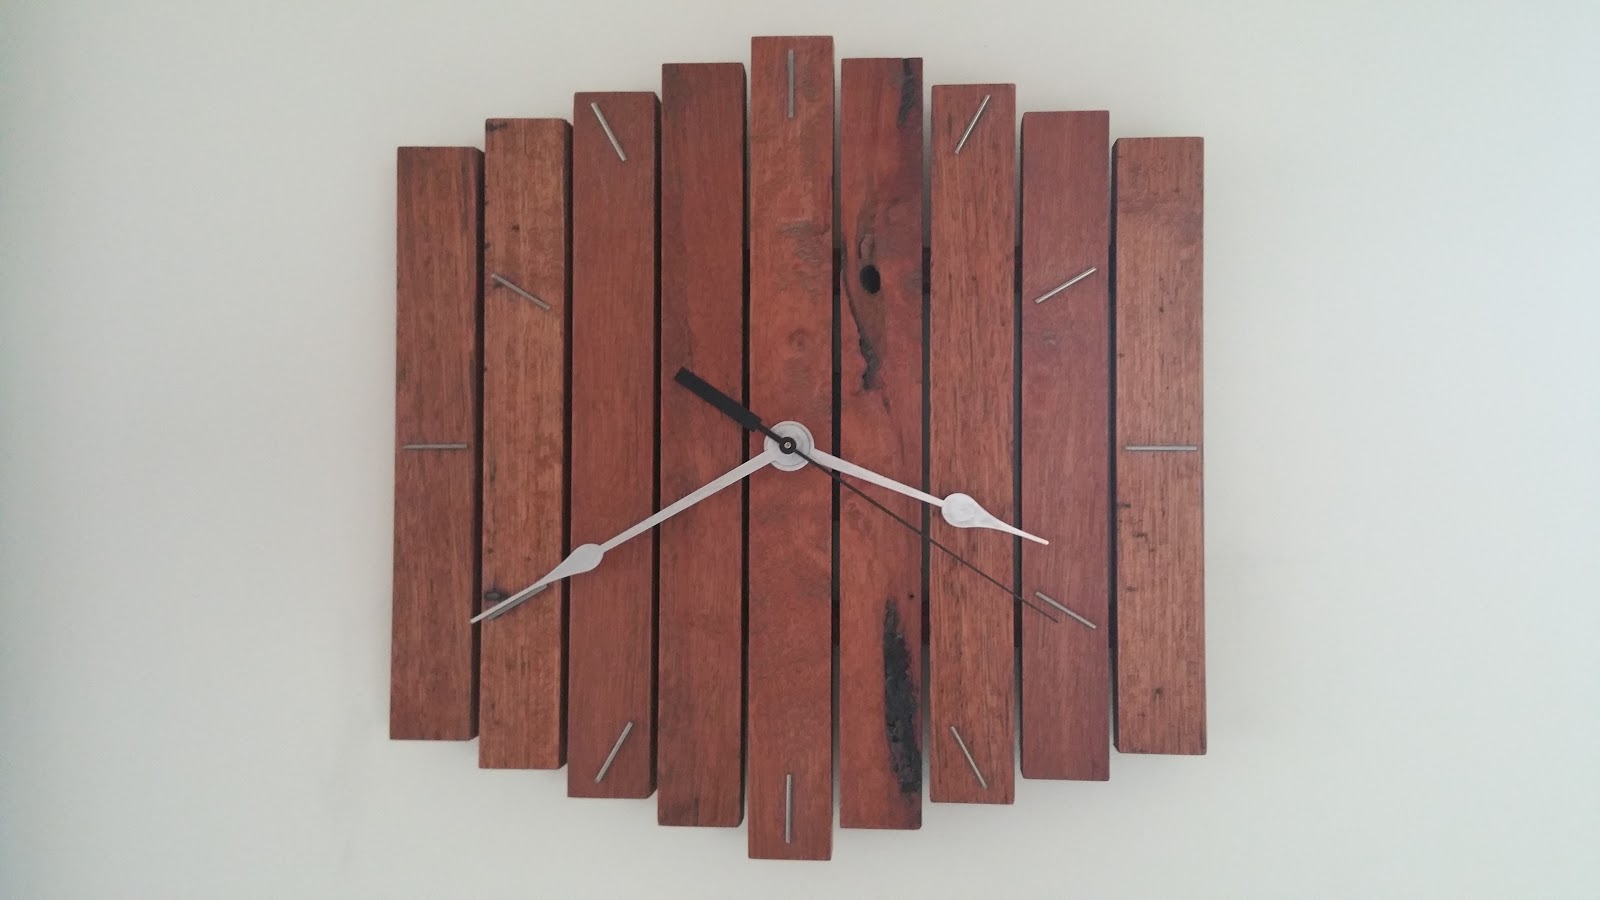
Making a Clock from Recycled Wood

Here is a small, easy project to make a recycled timber clock.

I was thinking of buying a clock from a shop during the sales period, but the quality and look was very poor. So I thought - how hard can it be to make one? The answer - not very!

The tools I used for the project were: a table saw, a mini router, wood glue, a drill, some Danish Oil and various sandpaper grades. Note that depending on your timber, you might not need the table saw or the router if you can adapt the design to suit your timber.

Step 1 - Choose your timber

This is important because we are going to use recycled timber which is of an unknown size. Only once we have chosen the timber can we think about the design and an appropriate clock mechanism to fit.

The timber I am using is recycled Karri from Western Australia that had been used to facade a built-in BBQ. This is dense, heavy timber and soaks up finishes really well, giving a nice look. It is 15 mm thick and varying widths around 90 mm.

Step 2 - Design a clock face

Recycled timber clock design in SketchupThe next step was to design a clock. I like to use Sketchup, which I have used for several projects. While I could draw this easily on paper, it is easier to share a 3D model online.

The final clock will be about 300 mm x 300 mm. I plan on using 2.80 mm nails as spacers giving an overall width of 293 mm. You can use whatever sizes you like - just adjust accordingly to get the look you want.

Step 3 - Choose a clock mechanism

Continuous sweep clock mechanism with 12 mm shaftMy first step was researching the different mechanisms. While there were several web sites that sell mechanisms and watch hands, I found www.letsmaketime.com.au to be the most appropriate for me. Specifically, they sell mechanisms that are "continuous sweep".

This was important to me as I did not want a clock that ticked! I already have two clocks in our current house that click very loudly, so this was an important factor in choosing this type.

Continuous sweep clock mechanism kit
I chose the mechanism with a 12 mm shaft, as the timber I was going to use was 15 mm thick, so this was close enough for a rebate to be routed in order for the appropriate distances to be accurate.
It is difficult to find mechanisms over this size that are reasonably priced, so I was happy with this compromise.

The clock hands are up to 115 mm which should be comfortably inside the clock face dimensions.

Step 4 - Cut your timber

Cut timber ready for gluingThe Sketchup diagram gives me 9 pieces to cut, all 30 mm wide, then varying lengths with 20 mm difference between adjacent bars. Then I'll cut two rails that go behind the bars to hold everything in place.

I then sanded first with 180 grit, then with 240 and finally 320. This does not need further fine sanding as the finish goes on better at this level of roughness.

Step 5 - Route space for the clock mechanism

Routing a rebate to suit the mechanismThe next step is to route the back of the middle three pieces to enable the mechanism shaft thread to protrude 2 mm from the front of the clock.
I need a depth of timber of 12 mm which takes in to account the washers and nuts provided in the kit.

The pre-fitted clock mechanismMy timber is 15 mm deep, so I need to route a 3 mm deep area. This is easily done with the mini plunge router and a 12 mm straight cut bit. Ok! Let's see how the mechanism fits...

Well, good and bad. I didn't take in to account that there is a raised plastic ring around the base of the mechanism that holds it off the wood 2 mm. I should have routed out 1 mm overall, then another 2 mm of about 20 mm diameter around the based. Instead, I have used tape to pad the space out. This should be fine.

Step 6- Arrange and glue the timber

Gluing up the clock componentsI arranged the pieces on my workbench using 2.8 mm nails as spacers.

Note that my back rails were beveled at 45 degrees to give a nicer final look. They are set back 5 mm from the edge and are 15 mm square (as they are off-cuts).
The glued clock
 The finished product prior to applying a finish.


Step 7 - Apply a finish

Applying danish oil to the recycled timber clockI decided to use Danish Oil for this project for a couple of reasons. One, it's quite easy to deal with, although the drying times are long (8 hours). Two, as this is not a piece of furniture that will be subject to wear and tear, the finish does not need to be durable. Three, I really like the way the oil brings up old timber as you can see from the photos.

Just brush on and wipe off after a few minutes. I applied a second coat after 8 hours using 400 grit wet and dry sandpaper to remove any imperfections and a give a better final appearance that is more professional.

Then finally I use 0000 steel wool to apply a paste furniture wax to bring out a nice satin sheen.

Step 8 - Add a hanger

The clock kit came with a hanger that could be attached to the mechanism. As this would not fit with my design, I decided to re-purpose the hanger and screw it to the frame instead.
I cut the hanger with some tin snips and drilled a 5 mm hole to accommodate a screw.

Step 9 - Colour the hands

Painting the clock hands silverThe hands I bought came in black. The other options were white or gold. I would have preferred silver, so I have used a paint pen to colour the hands silver. Not a bad job and will not be noticeable from any distance.

Step 10 - Add hour marks

Cutting nails to use as hour marksThis is a bit of a challenge because I wanted silver marks and not numbers.
So I decided to make the marks myself from 2mm diameter nails.

I cut the nails to 25 mm in length using a pair of pliers and then marked out the positions using a protractor and some tape to draw on, not wanting to mark the surface.

I then created a template from this website that allowed me to create a clock face template with a diameter of 200 mm and with a hole diameter of 8 mm to match the size of the drilled centre hole.

I aligned the template and taped it in place. This will then allow me to epoxy the cut nails to the surface in the right positions.

The Finished Product

I'm very happy with the finised product. You can see that the extra pieces such as the hour marks and the silver hands really improve the overall look.

Where to from here? Build some more clocks from recycled wood. Why not?