Friday, 4 August 2017

Making a Recycled Wood Coffee Table

I need a coffee table for the house on the acreage, so what better way to make a rustic one than yourself out of recycled wood.

Step 1 - Source the wood

The best local-ish timber/lumber place is Urban Salvage in Spotswood, west of Melbourne. They sell both reclaimed timber as well as new, kiln-dried. I prefer the reclaimed, however you are restricted by size.

I'll be making this table from recycled Messmate, which has been the most common building timber in Victoria and therefore creates the most amount of recycled and remilled timber.

It comes in a variety of sizes, but I'll be using 80 x 40 mm for the legs and ends and 115 x 35 mm for the top. The bottom shelf is from 142 x 19 mm flooring, while the rails will be cut from 100 x 40 mm lengths.

Step 2 - Design

Recycled timber coffee table design in SketchupThis design uses the 80 mm beams for every piece except the lower shelf, which has three pieces at 19 mm. Some pieces, such as the side rails, will need to be cut from the 100 mm pieces

I'm only using edge-gluing and biscuit joining in this piece to keep things simple.

Step 3 - The lower shelf and side rails

This is made from 3 pieces of 142 x 19 mm flooring where I have removed the tongues and grooves on the table saw.

I checked my edges for square (perfect!) and set up my jig for gluing.


Preparing for glue upI have decided not to use biscuits for the shelf and instead to use edge joints with sufficient clamping to create a flat surface.


The boards are sitting on strong rails that are taped over to prevent damage from any excess glue. The the boards are edge glued and aligned and a top rail is clamped down to level the boards.


Finally, the horizontal clamps are tightened to pull the boards together. I left the jig overnight to dry.


I also cut the two side rails at 40 mm high (to match the end rails) and biscuit joined them to the main piece.


1st gluing of the top Step 4 - The table top

I'm gluing up the table top in three separate stages to ensure it is as flat as possible. Without a thicknesser, I cannot guarantee that the boards will align, so I need to avoid as much sanding as possible but getting the boards to glue up as close as possible. I have used the table saw to get the edges square.

I'm starting with three boards. The middles board is not quite the same as the other two, so I'm using clamps to hold the pieces as close as possible while the glue sets.

Then I join the side pieces on with biscuits. This allows for some variation in the side pieces and gets them correctly aligned. This, in turn, reduces sanding.


Step 6 - Then end frames

The end frames are quite simple pieces, all biscuit joined together. I'm using double biscuits, well aware that these joints are not as strong as traditional mortise and tenon joins. But I don't have the equipment and can't justify the cost just yet. So its biscuits all the way!
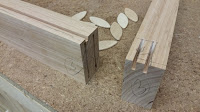
To get the double biscuits aligned, I used the table top as the main edge, then used 6 mm MDF as well as 19 mm ply as spacers. This gave me consisted biscuit spacing with 6 mm between the biscuits. I was very happy with this process as it was really easy and the result as a frame that was easy to glue up.

Prior to gluing I did the all-important step of cutting additional biscuits to glue the bottom shelf in place, as well as biscuits for the top two side rails. This will make life a lot easier afterwards.

I also cut a 5 mm slot in all the top pieces to allow table z clips to be used to join the top on afterwards.

 After all this measuring and cutting, I finally had my two ends!

Step 7 - The crossed end pieces

While the crosses on the end are the hardest part, they really add an element of design to what is otherwise a pretty standard oblong table.

It was quite easy in the end. I simply lined up the cut pieces on the finished end-frames, drew a line with the pencil, then adjusted the drop-down mitre saw to cut at that angle. It went very well and I had the main cuts done in no time.

Then I repeated the process for the partial cuts to allow the crosses to interlock with each other. I set the depth of the mitre saw to 19 mm (halfway) and did a series of cuts to create the final groove in the timber. Then it all slotted together nicely.

I then drilled holes from the top and bottom of the frame to enable later screwing in of the crosses.

Step 8 - The big glue-up

Glue-upGluing takes two people, not because it is complicated but because you just need an extra pair of hands to hold things in place.

I don't have fancy woodworking clamps that can cover the length of the table, so instead I used ratchet tie-downs across the top and the bottom. This pulled the pieces together quite nicely.

After leaving this overnight, I was happy with the result.

Step 8 - Sanding and finishing

I sanded with the belt sander to from 40 then to 80 grit and finally with the orbital sander to 180. Then by hand to 240.

Cleaning up the dust is easiest with a Tack-Cloth. If you have never used one before, this is definitely recommended as it is a sticky cloth that can pick up the fine dust. It is especially good prior to painting, but I use it prior to oiling as well. You can pick them up from any hardware store. Just know what to ask for...

For this project I have opted to use Danish Oil with a satin urethane over the top. Danish Oil is a beautiful finish for any old timber as it soaks in and darkens the timber, but not too much. Just enough to bring out all the grain and texture. You can then paint over the top and a urethane is best for a table to give it some surface strength. I use Minwax Wipe-on Poly, oil based (because the water-based stuff is horrible). This produces a run-free finish, although it does require 3 to 4 coats. But it is good for getting in to small crevices, such as those created by the crosses.
Applying wax
I did end up finishing the crosses before final installation. This enabled me to apply furniture wax. I also finished the base prior to screwing the top on.

The final finish was done by using furniture wax and 0000 steel wool. Just rub the wax in with wool and plenty of elbow-grease, then get some clean wool and wipe up the excess, turning the clean wool several times to ensure all traces of excess wax are removed. This ensures that the surface will be free from smudges once used.

Step 9 - Attach the top

The top was attached by Z-Clips. These came from a woodworking supply shop and are easy to install with 8Gx20mm timber screws.

This gives us the finished product!
Finished coffee table

I hope you enjoyed reading this and if you have any questions, feel free to send me a message.


Wednesday, 26 July 2017

Dams to Wetlands: Part 2 - Planting around a dam

In this post, I'll cover some of the plant types that can go in to the various zones around a dam that I covered in the previous post - Part 1.
Planting around an old dam Sunday 23rd July 2017
The above photo shows the Sunday morning setup for a lesson on dam planting hosted by Dave and Beth from Muckleford Landcare. It was very informative and I thought it was worthwhile to reiterate some of the planting options here.

The best plants are ones that are indigenous. These are not to be confused with natives. Some natives are unsuitable and considered weeds. Consult your local nursery or Landcare group to find out which indigenous plants are right for your area. Below, I will cover those plants suited to the Victorian Goldfields, however, the basic theory of planting will be the same regardless of location.

Indigenous plants are good because they tend to establish well, tolerate the local conditions and require zero maintenance. If you need to water a plant once it has been planted (always water at planting time), then you have the wrong plant.

In the buffer zone plant trees and shrubs and, as mentioned in Part 1, place them to the North-West to provide shade and a wind break to minimise summer evaporation.

In addition to the trees and shrubs, it is vital to plant grasses to stabilise the soil and begin that water filtering process. In our area Poa labillardierei (Common Tussock Grass) is ideal.

In the batter zone and down in to the wetter parts, various species of Rushes (Juncus sp), Sedges (Carex sp), Spike Rushes (Eleocharis sp), Sea Club Rushes (Bolboschoenus sp), Flat Sedges (Cyperus sp) and for wetter areas, Jointed Twig Rush (Baumea articulata) are ideal. These plants are riparian, a term nurseries may know which means plants that live next to water.

In the permanent water zone, Water Ribbons (Triglochin sp), Water Milfoils (native Myriophyllum sp) and Ribbonweeds such as Vallisneria americana (Eel Grass) are suitable.

Once established, you will find that many additional plants will self-seed as a result of natural events such as flowering and transmission by birds.

You can even take Wallaby Grass slashings and lay them around the areas you want planted and natural reseeding will occur.

Here are some more photos from our planting day. Note that there are some additional very local plants here in addition to those mentioned above.


Tube-stock is best, resulting in stronger plants

Always protect plants unless you want them eaten...

Enjoy your planting!

Dams to Wetlands: Part 1 - What Makes a Good Dam?

Dams on farms have traditionally been used for farming practices - primarily stock watering and crop irrigation. As such, they were often placed on the land where these needs were best met or where they could easily be fed from a water source.
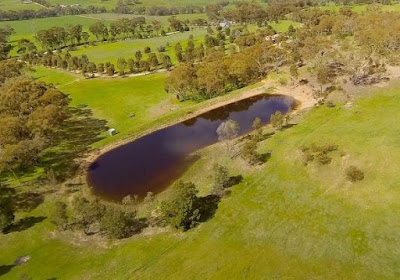
Our dam from abouve

Nowadays, with a growing number of people looking for lifestyle improvement on their rural properties, dams have become a critical factor in both the aesthetics of the property and in supporting native flora and fauna. This means that health, position and appearance matter far more than in the past, but that traditional placement and management may be at odds with our new-found love for nature.

This is the first of many (I hope) blogs on the process of transforming dams to wetlands. In this edition, I want to cover some of the essential criteria of dams that make them well suited to being wetlands. However, I should point out that any dam can be a wetland if you want to make the effort!

Dam zones

A dam consists of several zones that each contribute differently to the ecology. Each zone requires a different approach to planting and maintenance with the goal of making the dam as healthy as possible.

Catchment zone

This is the surrounding paddock. The area where rain will fall and run in to the dam. This area needs to be grazed to a minimum, as the plant life and soil are critical for straining the run-off to keep chemical residue and sediment from running down in to the dam.

Buffer zone

This area is typically from the high-water mark out to 20 metres. From an ecology point of view, this is perhaps the most important area and needs to be fenced to exclude stock.

Once stock is excluded, this area will often naturally re-vegetate with plants that are well-suited, such as native trees, shrubs and grasses, however, some extra planting here can't hurt to give nature a helping hand.

One area of focus should be the north-west corner of the dam, which should be planted with groups of trees and shrubs to create both shade and a wind-break to protect the dam from evaporation on hot, summer days when the wind is blowing from the north west.

Another key function of this area is water filtration. Planting tussock-forming grasses in this area will help filter the sediment from the water, creating a cleaner dam, as well as stabilising the soil.

In this area, you can also add tree logs and other structural elements as habitat forming features that will help protect birds and and provide shelter for many animals.

Batter zone

This zone is between the low and high water marks. This area is nutrient rich and is best suited to planting native rushes, sedges and reeds. You will need to experiment with these plants as some might not survive water inundation when the dam is full, but this is dependent on your specific circumstances.

Permanent water zone

Fairly self-explanatory, this area is wet all year round.

Plants in this area can both filter the water and provide protection from wave action caused by the wind.

Location and permission

In Victoria, we can typically build dams and ponds up to 3 mega-litres without a permit, as long as they are not within a waterway or natural gully. A natural gully is not just a furrow on your land that feeds the dam, but a significant depression in the landscape that is part of the waterway system, even if it is dry most of the year. Check your local regulations.

The location for your dam depends on a number of factors determined by the use of the dam.

If your dam is for irrigation, then an elevated position is ideal as it allows gravity to feed the areas you want to irrigate, or at a minimum means minimal pumping heights.

You will need to consider how your dam is fed from the catchment zone. Some big dams are located in areas of minimal catchment and never fill, leaving a more unappealing view.

An alternative to a big dam might be a series of small, connected ponds. Tapping in to a catchment via a man-made "creek" can feed your ponds with the overflows connecting the chain. This can create a very aesthetically pleasing sequence of water-features that may be cheaper to create, fit the landscape better and provide a better habitat for the flora and fauna you are hoping to attract.

And again, this should be to be completed without a permit (but please get your own local advice on this).

Construction

One issue many landholders face is who will build their dam? Many contractors with diggers are great at digging holes, and may be able to construct the dam correctly in terms of sealing, overflow and overall soundness. However, not many will have the knowledge of where to place the dam and how that impacts on your usage, nor will they be able to make a proper dam, over just a hole in the ground

A key recommendation is to contact your local Landcare group, who should be able to put you in touch with an expert who can guide the process. They should be able to give advice on location, shape and size, based on your specific needs. They may also be able to connect you with an appropriate contractor that can do the job right. The consequences of a bad job are not worth considering.

The ideal dam

When it comes to the ideal dam for a wetland, we are looking for several key points.

The catchment, buffer and batter zones should have a gentle slope in to the water. This prevents rainfall from cascading down the hill at a high velocity, which in turn allows water penetration in to the soil and filtering to occur. This is, therefore, critical in preventing erosion and creating a healthy environment.

The gentle slope in to the dam creates the batter and buffer zones where the majority of wildlife will congregate, helping you achieve your goal of a wetland. Plants like rushes and sedges will grow in this area.

The dam should, in turn, not be a hole in the ground, like a pudding bowl, but be more like a... dam, with a wall on one side allowing water to naturally accumulate. Even dams in paddocks can be constructed with gentle sloping sides, even if they are on all sides.

While many dams are dug out like swimming pools to maximise water retention by minimising evaporation, many deep dams never fill as they are too big for the catchment area, leaving more of an eyesore than a wetland. Don't build your dam bigger than it needs to be - consider the cascading pond option instead.

If you want to swim in the dam, consider a floating pontoon to get out in to the water and avoid the shallow, muddy or planted areas.

Old dams and dam maintenance

If you have an old dam on your property that has been neglected, you might be faced with some issues that could cost you money in the future.

The number one issue is trees and shrubs growing on the dam wall. The roots of these trees can create air spaces around them, as they grow or die back, thereby creating escape paths for the water.

You can check if your dam is leaking by simply looking at the ground below the level of the dam. If it stays green during dry spells, you have a leak.

However, it is not advised to remove these trees as that will weaken the dam wall and may require completely rebuilding the dam.

To maintain the dam wall, simply pull out self-sown plants on the wall annually. There should be nothing more than ground cover on the wall.

There are some options to seal dams. New, high-tech, non-toxic polymers can be sprinkled on a full dam which then sink to the bottom and bind together. Products such as Watersave (I have no affiliation) are interesting options and there seem to be some success stories if you Google this.

Another issue is "guttering", where water is eroding the bare soil around the batter zone. Consider placing small rocks in the gutters that will help to minimise silt run-off while you get your plants established.


In the next blog, I'll talk about planting the dam and how we can get that wetland happening.