I was thinking of buying a clock from a shop during the sales period, but the quality and look was very poor. So I thought - how hard can it be to make one? The answer - not very!
The tools I used for the project were: a table saw, a mini router, wood glue, a drill, some Danish Oil and various sandpaper grades. Note that depending on your timber, you might not need the table saw or the router if you can adapt the design to suit your timber.
The tools I used for the project were: a table saw, a mini router, wood glue, a drill, some Danish Oil and various sandpaper grades. Note that depending on your timber, you might not need the table saw or the router if you can adapt the design to suit your timber.
Step 1 - Choose your timber
This is important because we are going to use recycled timber which is of an unknown size. Only once we have chosen the timber can we think about the design and an appropriate clock mechanism to fit.
The timber I am using is recycled Karri from Western Australia that had been used to facade a built-in BBQ. This is dense, heavy timber and soaks up finishes really well, giving a nice look. It is 15 mm thick and varying widths around 90 mm.
Step 2 - Design a clock face
 The next step was to design a clock. I like to use Sketchup, which I have used for several projects. While I could draw this easily on paper, it is easier to share a 3D model online.
The final clock will be about 300 mm x 300 mm. I plan on using 2.80 mm nails as spacers giving an overall width of 293 mm. You can use whatever sizes you like - just adjust accordingly to get the look you want.
Step 3 - Choose a clock mechanism
 My first step was researching the different mechanisms. While there were several web sites that sell mechanisms and watch hands, I found www.letsmaketime.com.au to be the most appropriate for me. Specifically, they sell mechanisms that are "continuous sweep".
This was important to me as I did not want a clock that ticked! I already have two clocks in our current house that click very loudly, so this was an important factor in choosing this type.

I chose the mechanism with a 12 mm shaft, as the timber I was going to use was 15 mm thick, so this was close enough for a rebate to be routed in order for the appropriate distances to be accurate.
It is difficult to find mechanisms over this size that are reasonably priced, so I was happy with this compromise.
The clock hands are up to 115 mm which should be comfortably inside the clock face dimensions.
It is difficult to find mechanisms over this size that are reasonably priced, so I was happy with this compromise.
The clock hands are up to 115 mm which should be comfortably inside the clock face dimensions.
Step 4 - Cut your timber
 The Sketchup diagram gives me 9 pieces to cut, all 30 mm wide, then varying lengths with 20 mm difference between adjacent bars. Then I'll cut two rails that go behind the bars to hold everything in place.
I then sanded first with 180 grit, then with 240 and finally 320. This does not need further fine sanding as the finish goes on better at this level of roughness.
Step 5 - Route space for the clock mechanism
 The next step is to route the back of the middle three pieces to enable the mechanism shaft thread to protrude 2 mm from the front of the clock.
I need a depth of timber of 12 mm which takes in to account the washers and nuts provided in the kit.
 My timber is 15 mm deep, so I need to route a 3 mm deep area. This is easily done with the mini plunge router and a 12 mm straight cut bit. Ok! Let's see how the mechanism fits...
Well, good and bad. I didn't take in to account that there is a raised plastic ring around the base of the mechanism that holds it off the wood 2 mm. I should have routed out 1 mm overall, then another 2 mm of about 20 mm diameter around the based. Instead, I have used tape to pad the space out. This should be fine.
Step 6- Arrange and glue the timber
 I arranged the pieces on my workbench using 2.8 mm nails as spacers.
Note that my back rails were beveled at 45 degrees to give a nicer final look. They are set back 5 mm from the edge and are 15 mm square (as they are off-cuts).

Step 7 - Apply a finish
 I decided to use Danish Oil for this project for a couple of reasons. One, it's quite easy to deal with, although the drying times are long (8 hours). Two, as this is not a piece of furniture that will be subject to wear and tear, the finish does not need to be durable. Three, I really like the way the oil brings up old timber as you can see from the photos.
Just brush on and wipe off after a few minutes. I applied a second coat after 8 hours using 400 grit wet and dry sandpaper to remove any imperfections and a give a better final appearance that is more professional.
Then finally I use 0000 steel wool to apply a paste furniture wax to bring out a nice satin sheen.
Step 8 - Add a hanger
The clock kit came with a hanger that could be attached to the mechanism. As this would not fit with my design, I decided to re-purpose the hanger and screw it to the frame instead.
I cut the hanger with some tin snips and drilled a 5 mm hole to accommodate a screw.
Step 9 - Colour the hands
 The hands I bought came in black. The other options were white or gold. I would have preferred silver, so I have used a paint pen to colour the hands silver. Not a bad job and will not be noticeable from any distance.
Step 10 - Add hour marks
 This is a bit of a challenge because I wanted silver marks and not numbers.
So I decided to make the marks myself from 2mm diameter nails.
I cut the nails to 25 mm in length using a pair of pliers and then marked out the positions using a protractor and some tape to draw on, not wanting to mark the surface.
I then created a template from this website that allowed me to create a clock face template with a diameter of 200 mm and with a hole diameter of 8 mm to match the size of the drilled centre hole.
I aligned the template and taped it in place. This will then allow me to epoxy the cut nails to the surface in the right positions.
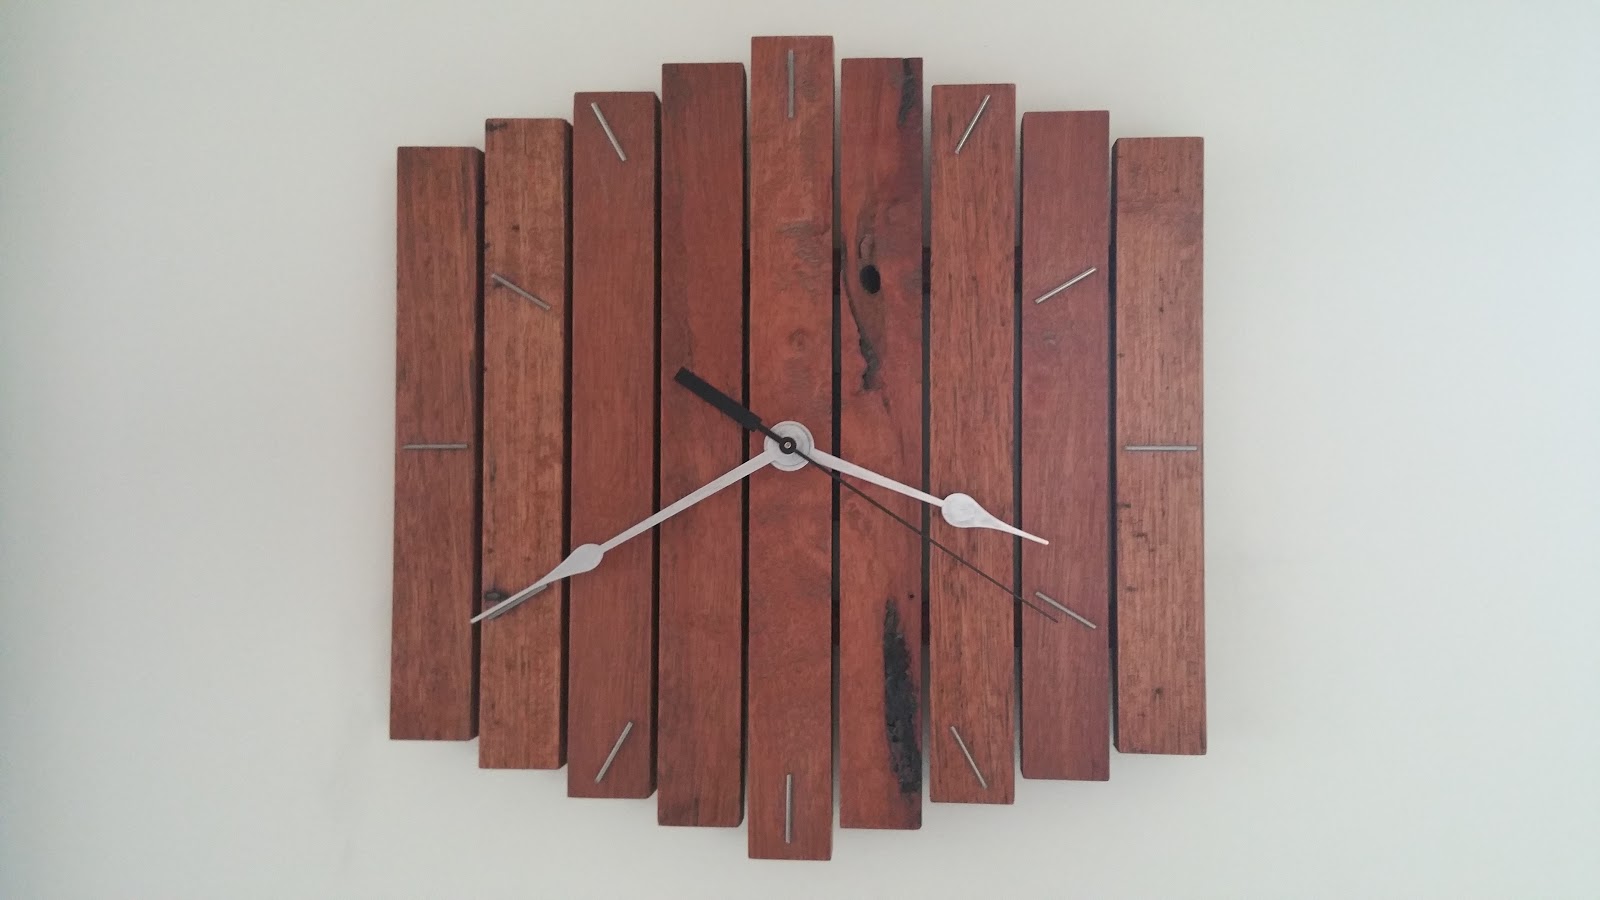
The Finished Product
I'm very happy with the finised product. You can see that the extra pieces such as the hour marks and the silver hands really improve the overall look.
Where to from here? Build some more clocks from recycled wood. Why not?